Flash Tests, Part 2 (Freezing the Motion of a Bee Wing)
In my previous post, I described the results of my first disposable camera flash tests, and their implications based on the speed and size of a bee’s wing. I decided to take the plunge and test some really expensive capacitors, to see if they really make a difference or not. There is a limit to how much I’ll be willing to do to shorten flash duration—pulse shaping with inductors may be possible, though they may require a lot of experimentation (and parts), and, although using an IGBT to cut the pulse short is a possibility, the expense is a factor (depending on how many flashes I will have to have in an array).
The first thing I did is modify the layout of the Fuji circuit I was using. Soldering and desoldering the capacitor started to rip the traces off the board, so I soldered some solid wire to have leads (to which I would in turn solder the test capacitors). I didn’t have solid wire so I used the leads off a high-voltage capacitor. The mechanical trigger switch (normally hit by a moving part from the shutter mechanism) I replaced with a pushbutton, even though it was relatively easy to actuate as it was. The flash “on” button (normally actuated in the front of the camera) takes a bit of pressure and is dangerous when the whole circuit is exposed like this, so I also replaced it with a pushbutton. I put a power switch on the battery holder (I used a metal 2-AAA holder because it wasn’t pre-wired for series or parallel) so I could stop the flash from recharging (typically they auto-recharge after firing). As always, I hooked up my trusty capacitor discharge tool to the capacitors before charging them. This time I also connected my voltmeter to that so that I could see what the capacitors were charging to (which was a surprise; see below). I also hot-glued the flash bulb assembly (which luckily in this camera comes out cleanly with the reflector and “lens”) to the board so it would be in a consistent place, and held the board in a small vice always at the same angle for the tests. With a tape measure, I put the flash facing more or less the same direction some 16.5 inches from both my Sekonic Flashmaster L-358 and my home-built strobe light output test circuit.
 I retested the capacitors from last time so that I could have a true comparison. The Flashmaster gave me a photographic exposure value, and at 16.5 inches away, the setup represented a realistic setup so the number should be quite valid.
The expensive capacitors tested were all obtained from Mouser (which had a better price over Digi-Key). The table below shows all the capacitors tested, including the ESR as measured with Smart Tweezers, and the exposure measured with the light meter set to 400 ISO (16.5 inches or so away from the flash).
| Part Number | Capacitance (μF) | Voltage (V) | Measured ESR (Ohm) | Price | Aperture @ 400 ISO |
| CDE UNL8W15K-F | 15 | 800 | 1.2 @ 0.1kHz | $30.23 | f/11 @ 400V |
| CDE UNL4W30K-F | 30 | 400 | 0.5 @ 0.1kHz | $26.16 | f/16 @ 370V |
| Epcos B32676-G4156-K | 15 | 450 | 1.1 @ 0.1kHz | $7.87 | f/8-f/11* @ 390V |
| Epcos B32678-G6256-K | 25 | 630 | 0.6 @ 0.1kHz | $11.89 | f/11-f/16* @ 385V |
| Epcos B32678-G4356-K | 35 | 450 | 0.4 @ 0.1kHz | $12.59 | f/16 @ 380V |
| Panasonic EEU-EB2G100 | 10 | 400 | 4.8 @ 0.1kHz | $0.78 | f/5.6 @380V |
| Nichicon UVR2G220MHD | 22 | 400 | 1.8 @ 0.1kHz | $0.86 | f/11 @ 375V |
| United Chemi-Con EKMG401ELL470MLN3S | 47 | 400 | 1.4 @ 0.1kHz | $1.17 | f/16 @ 370V |
| United Chemi-Con EKXG401ELL820MM25S | 82 | 400 | 0.5 @ 0.1kHz | $1.76 | f/22 @ 350V |
| Yalecon Photo-Flash | 100 | 330 | not measured | came with Fuji camera | f/32 @ 350V |
Each capacitor was fired twice. Surprisingly (for me anyway), the smaller capacitors easily charged to higher voltages. In some cases I got scared, especially since the board as-is would charge the capacitor it came with to a voltage higher than that written on the label. I did not record the “decimal number” on the aperture measurements from the light meter, thus the capacitors with asterisks (*) showed both values depending on how high a voltage I let them be charged to.
The first thing to note about the expensive capacitors is that they are enormous. All of them were bigger than the entire circuit board. A custom board could elegantly be mounted to the capacitor housing, making a pretty neat little unit.
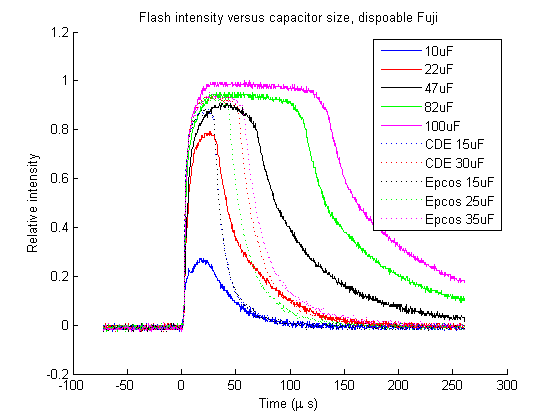
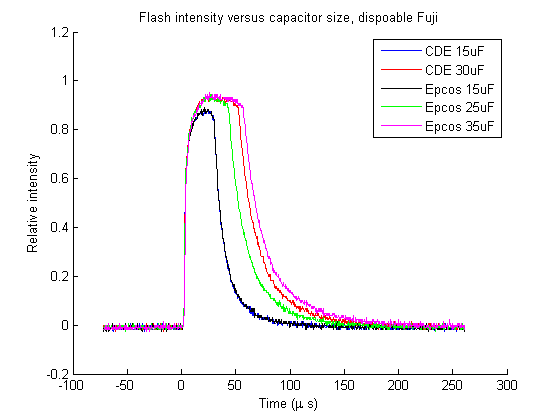
The first plot above includes both the expensive capacitors and those tested last time. The second plot shows only the expensive ones. The curves for the Epcos and Cornell-Dubilier 15μF capacitors are effectively identical. The cost for the Epcos part is nearly 4 times less—though, in all fairness, the voltage rating of the CDE part is 800V (vs. 450V for the Epcos). The low ESR of these capacitors (as compared to the cheap ones) makes the peak intensity of the pulses higher, but, more importantly, they shorten the “tail” at the end of the pulse. Compared to the cheap 22μF capacitor, the peak intensity is some 10% higher for the expensive 15μF capacitors. The intensity at 50 microseconds for the cheap capacitor is perhaps only half of the peak intensity, whereas for the expensive capacitors, it is almost a factor of 8 less—meaning we would have a much better guarantee of a truly short exposure with the expensive capacitors.
Increasing the capacitance to 25μF increases the exposure by one stop, but the pulse length increases by some 50% and the price by over 50%.
Conclusion
The $8 price tag for the Epcos B32676-G4156-K is certainly attractive. It meters at the same exposure as the 90-cent 22μF capacitor—f/11 at 400 ISO. I should reiterate that these exposure values are without any flash-focusing whatsoever—only the reflector that came with the camera was used. It may be possible to gain even one more stop with a snoot or more “active” methods of guiding the light (lenses and/or reflectors). The most recent conclusion from the lens tests is that we would use an aperture of f/11 or f/16. So, surprisingly, it seems that we don’t need a flash array at all! If we go with the Epcos, we may have enough light with just one or two flashes at an exposure length of 50 microseconds or so. To gain one stop, we must double the number of flashes. The following table counts the number of Epcos-powered flashes necessary for a given film/aperture combination.
| ISO | f/11 | f/16 |
| 400 | 1 | 2 |
| 200 | 2 | 4 |
| 100 | 4 | 8 |
| 50 | 8 | 16 |
The cost of getting [guaranteed] identical flash circuits is some $3 (expired disposable cameras). The main parts of interest are the transformers and flash bulb, regardless of whether or not a custom board is made. The capacitors, as mentioned, are some $8 a piece, though at quantities of 10 and higher there is a slight price break. This means that for some $250 it would be possible to build a 16-flash array with a short pulse length and enough light to expose 50 ISO film through an aperture of f/16, all while having logic-level triggering (with extra parts, of course).
A lower ISO film speed is important in case our shutter does not have a fast enough shutter speed, because a lower ISO will ensure less natural light blurs the image. Then again, increasing the number of flashes in the array may increase the total pulse length due to small differences in the components and triggering. There is no way to know the effect until multiple flashes are built and fired simultaneously.
Also, this may be a good time to test the lenses again. Last we left it, we still have to choose an aperture based on sharpness/depth of field balance. A test target (a dead bee maybe?) could be used to test the depth of field and actual exposure quality with these flashes, and a fast moving target (such as a rotating disc) can be used to test the actual pulse length.
I have bought a few different cameras from ECameraFilms to evaluate which would be easiest to modify for the final camera—I want to be sure all the circuits are identical, and I figured my best hope is to buy all the disposable cameras together. In the next post I’ll report what I find.
About this entry
You’re currently reading “Flash Tests, Part 2 (Freezing the Motion of a Bee Wing),” an entry on Insect Camera
- Published:
- 16.06.08 / 9pm
- Category:
- Flash
No comments
Jump to comment form | comments rss [?]