Initial Lens Tests
This weekend I did some preliminary lens tests after getting my hands on a Nikon D200. I was surprised to find some useful features for this task. For example, if one is reviewing pictures on the memory card and zooms in to a certain position and level, one can scroll through the pictures and the display will remain locked to that zoom level and position, which became very handy in evaluating if I had in fact photographed the target through the focus point.
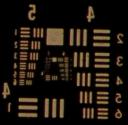
But I’m already jumping into some of the details. The idea was to test the image quality of several lenses I had on hand at some serious macro extensions to get an idea of working distance, field of view, and image quality that I could expect. The test target was a small 1951 Air Force target etched on chrome-plated glass, so that it can be back-lit. The light was a cheap halogen lamp from Target.
The nice thing about the D200 (versus the cheaper Nikons) is that it meters even if there’s nothing connected to the lens mount. To me this is simply blocked by the firmware in the cheaper cameras. There is no Canon in this price range, and the ones that compete with the cheaper Nikons have less metering modes, and, although I verified at least the 350D fires with no lens attached, I really wanted to be able to meter through anything I put in front of the camera. There’s always bracketing—especially with digital—but I thought the D200 offers the best of both worlds. Not to mention that I have a lot of old Nikon junk. These are a few of the reasons I chose this camera.
To make sure the camera stays clean in these situations, I bought the Nikon BR-2A reversing adapter, which has a male F-mount on one side and a male 52×0.75mm thread on the other (for attaching lenses backwards). I bought a 52mm multicoated UV filter (the “super multicoated” from Hoya) to use as a high-quality transparent cap on the camera for shooting through these test lenses.
I set up everything on an aluminum rail to make alignment easier, but the heights were not perfectly aligned, so the camera and lenses are not perfectly centered. The dimensions I have written below are estimated—again, this is just to get an idea of which lens to proceed with, since that will determine a lot of the specifications of the system (shutter size, flash intensity, etc.)
Here’s a summary of the test conditions:
| Lens/condition | Pixels/mm at object | Magnification | 6×6 field of view (mm) | 4×5 field of view (mm) | Working distance (mm) |
| 14″ Commercial Ektar at twice the focal length | 192 | 1.17 | 51×51 | 87×109 | 700 |
| 14″ Commercial Ektar backwards, twice focal length | 184 | 1.12 | 54×54 | 91×113 | 700 |
| 105mm backwards, full bellows, infinity focus | 341 | 2.08 | 29×29 | 49×61 | 80 |
| 105mm backwards, shortest bellows, infinity | 98 | 0.60 | 100×100 | 170×213 | 300 |
| 105mm, full bellows, closest focus | 772 | 4.71 | 13×13 | 22×27 | 100 |
| 105mm, full bellows, infinity | 414 | 2.52 | 24×24 | 40×50 | 100 |
| 105mm, half bellows, infinity | 268 | 1.63 | 37×37 | 62×78 | 120 |
| 105mm, half bellows, closest | 564 | 3.44 | 17×17 | 30×37 | 120 |
| 105mm, shortest bellows, closest | 436 | 2.66 | 23×23 | 38×48 | 150 |
| 105mm, shortest bellows, infinity | 186 | 1.13 | 52×52 | 90×112 | 150 |
| Hasselblad 120mm Makro (CF), full bellows | 260 | 1.58 | 38×38 | 64×80 | 150 |
| Hasselblad 250mm, full bellows | 126 | 0.77 | 78×78 | 132×165 | 500 |
(The 105mm lens referred to is the Nikon 105mm f/2.8 AF Micro Nikkor.) The key is the combination of magnification and working distance. If the camera is to be hand-held, then a longer working distance probably gives a better chance that the insects will make themselves available. If a big camera is moving close to the insect, I doubt they will be approachable. On the other hand, setting the camera up on a tripod and simply “waiting” for them to make themselves available may eliminate any advantage of a long working distance. According to this link, honeybees are between 10 and 20 mm long. This means that most of the setups tested above will yield a good-sized bee picture with medium format film, with the exception of extremely small field of views (which may be appropriate to get beautiful shots in 4×5 format).
This weekend I will do the tests more carefully; the results presented here were more or less eye-balled. I managed to find some more junk to make the setup a bit more consistent so I will be able to do more systematic tests. But for now, here are some through-focus animations of the image quality of two of the above cases:
1. 14″ Commercial Ektar at f/6.3
This was one of a famous series of lenses from Kodak, originally they were called the “Eastman Ektars” but once lens coating was developed the name of the series was changed to Commercial Ektars. According to this site, the earliest confirmed listing of this lens (as an Eastman Ektar) is in a Kodak reference manual with a copyright of 1942 and 1945. The Kodak Data Book from 1948 lists it as a Commercial Ektar, so this lens is, at the most, 60 years old. The rear-most element in these lenses is prone to having small (but visible to the naked eye) bubbles because they hadn’t quite figured out how to get the bubbles out during the manufacturing of the glass.

The animated GIF above shows a 128×128 pixel section of the image of the resolution target as the camera is moved through the plane of best focus. It is obvious that there is quite a bit of chromatic aberration, which, as far as I can tell, is both lateral and longitudinal chromatic aberration. Lateral chromatic aberration is when different wavelengths of light are focused at different heights (where heights in the optical sense means distance from the lens axis). This can also be interpreted as magnification of the lens changing with wavelength, so that the different color components of a white object generate different sized images, and, according to this website, can be seen as sharp color fringes on the images. Longitudinal or axial chromatic aberration is a change in focal distance with wavelength, which can be seen as individual colors looking in the animation above. Note that just as the camera approaches the best focus plane, the image seems to have a bit more green and blue, and then in the next image, there is a red haze around everything—this is longitudinal chromatic aberration.
You’ll have to forgive the dithering, since these are GIFs. You can also download the uncompressed AVI if you’d like. To give you an idea of the image quality this lens is capable of, below is a 400% magnified section of the image at best focus (note that by best focus I mean the image that came out the best from the sequence I took as I moved the camera through the focal plane—that is, it’s possible there is a better image at a more precise focusing increment). The lines just below the backwards 5 are 15.625 microns along their [short] thickness.
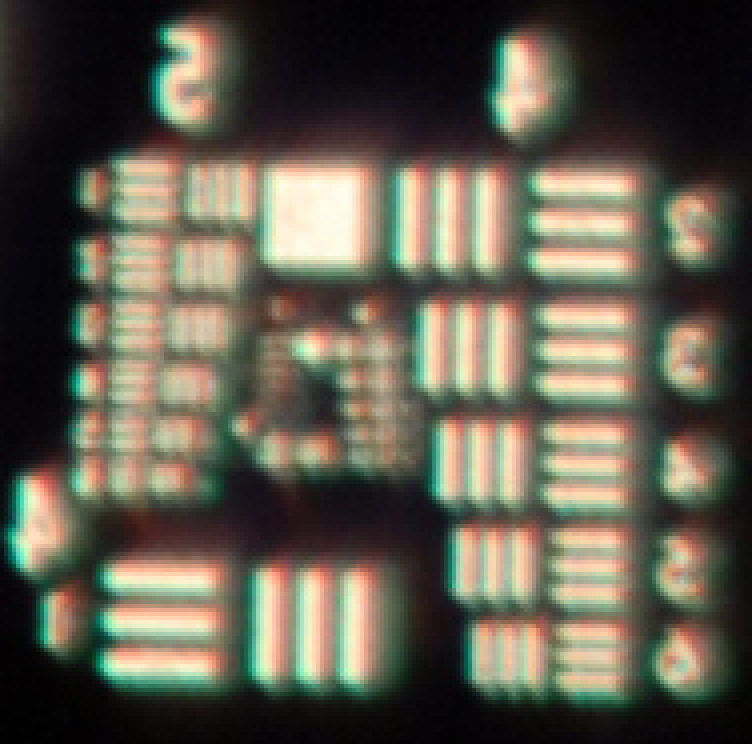
I believe because there is color fringing in the image—that is, one side of the lines looks to have a redish edge while the opposite side has a blueish haze—that the primary chromatic aberration is lateral. For old technology, I’d say this is pretty good, especially since this was not meant to be a macro lens.
2. 105mm AF (Auto Focus) Micro Nikkor
In the condition of minimum bellows extension and infinity focus, this lens has approximately the same magnification as the Kodak. This lens was tested at SLR Gear, a pretty decent place to get some scientific measure of lens performance. I have not read their test descriptions thoroughly, but although it is the best I’ve seen in the web, it could use some robustness. Testing lenses is a big pain, as I’m finding out even with my thrown together setup, so I’m thankful that they do anything at all—at least their own results can be compared to each other if nothing else. Honestly the worst part of their website is finding the lens; I suggest that you use the search box because nothing else seems to make any sense.
But back to my tests. Here’s the animation:
Here is the AVI, if you want it. In the magnified section below, you will notice this lens at these conditions has the same problems as the Kodak, and they are even worse. The 105mm (which I’ve had the pleasure to take apart to the diaphragm for a school project) actually has three sets of elements that move in different directions at different speeds through the focusing range. The Kodak is a pile of glass screwed together. It really makes you think—although honestly no one would put the 105mm lens on bellows and then focus to infinity (it seems to perform much better at close focus, as we will see).

As a summary here are some magnified images of some of the other lenses; all the images are the same pixel scale and of the same region of the target (but the optical magnification is not the same):
3. Hasselblad 120mm Makro (CF f/4) at full extension—overall I believe this has the best image quality.
4. Hasselblad 250mm f/5.6 at full extension—this is not a macro lens, but gave some amazing results.
5. 105mm AF (Auto Focus) Micro Nikkor at half extension and closest focus—the magnification is much higher here, and the image quality is comparable to slightly better than the two Hasselblad lenses. To show the same region of the target at 400% zoom, the image ended up pretty large, so just click here to get it.
About this entry
You’re currently reading “Initial Lens Tests,” an entry on Insect Camera
- Published:
- 26.06.07 / 8pm
- Category:
- Lens
No comments
Jump to comment form | comments rss [?] | trackback uri [?]