In continuation to my first post in the series….
By reading the above post you will see that my 500 EL/M broke when I tried to remove the lens. The way I had left it, I had epoxied the gear back onto the shaft which held up—until I put film in the back, and the glue immediately broke off.
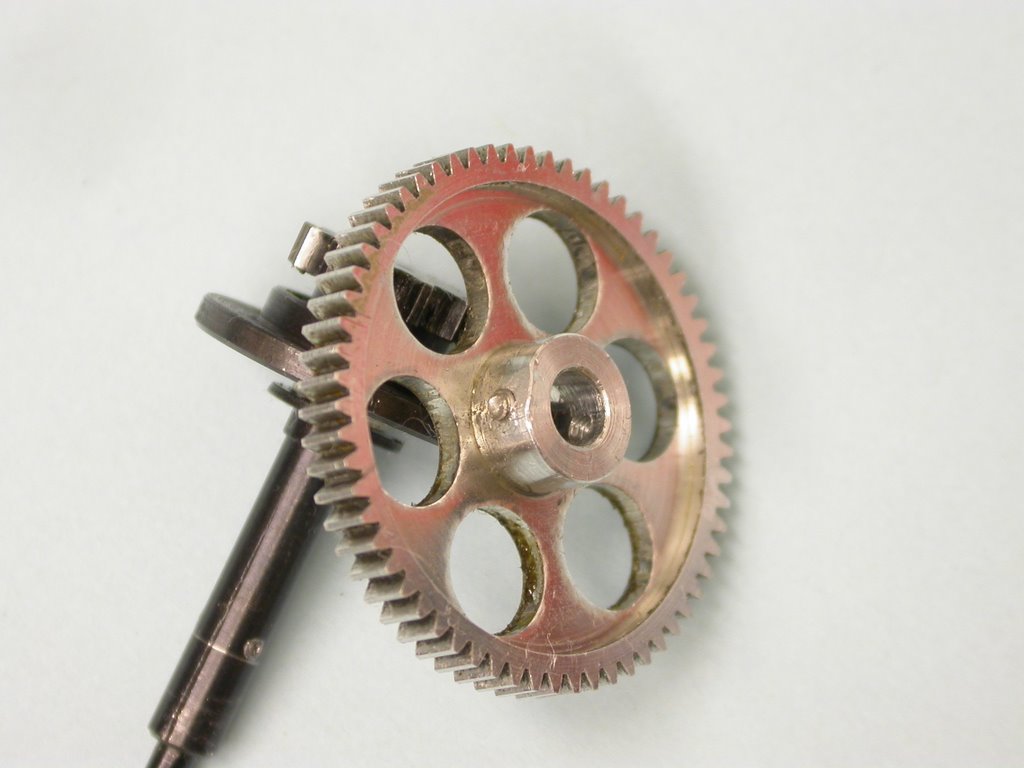
So I knew I was going to have to do something better than that. I took the whole motor assembly apart, and yanked the gear off the shaft:

If you look carefully on the shaft, you will see a shiny line around the shaft near the tip on the lower left—this is scuffing caused by the shaft spinning but the gear not going anywhere, and conveniently marks where the gear should be mounted. The circle you see right next to the line is still a mystery.
Looking very closely at the gear, it seemed as though it had two rivets of sorts to hold it onto the shaft, and this circle must have been where one of them attached. I have no idea if they were welded, glued, or what. Certainly not a good way to hold a gear onto a shaft, it seems—or maybe Hasselblad built it in as a safety feature? (Damnéd hard drives.)
In any case, I decided the only way I was going to fix this was by putting set screw(s) on the gears and machining a flat spot on the shaft for them to make good contact. One of the mini-rivets or whatever was slightly sunken in from the outside of the gear, which allowed me to stick a drill bit in the very edge of the hole instead of starting a new hole out.
Because of the diameter of the gear, and the short length, I couldn’t get a center-drill that I could hold in a chuck to clear the gear while marking for a new hole, so my only hope was use the rivet holes, enlarge them as little as possible, and tap them. The tap size was also a constraint, since if it were too big in diameter, it also would not clear the gear diameter. The best solution I could find was to use a 0-80 screw. They are tiny (you will see).
I couldn’t find a drill of the correct tap drill size for 0-80, so I went with a slightly larger diameter bit. I put it in a small chuck and by hand drill into the rivet hole, which pushed the rivet through to the bore of the gear. I kept going and drilled across both holes from one side, pushing out both rivets.
Then came the tap… which didn’t quite clear the gear. I could get most of it in, but where it tapered out to fit in the standard holder it was hitting the gear and pushing the tap at an angle to the hole. I sure as hell didn’t want to break the tap that wasn’t mine, and I wasn’t even supposed to have access to. So I went as far as I felt safe, then put in a socket-head 0-80 screw and figured if there was only one or two threads left to cut I could do it with the stainless-steel screw on an aluminum gear.
Nope.
Sheared the head right off:
You can see it almost looked like I could get some pliers and pull it out—but it was jammed in there. That side of the gear hub is flattened a bit, as you can see, which makes me think maybe this wasn’t the first repair on this camera… though I believe I am the second owner and it was barely used.
Luckily I had one more chance with the other hole. I just carefully persisted with the tap. Going very little at a time, then backing out, etc. Eventually I got through and had a nice threaded hole:

By the way, the gear is about the size of a quarter (a bit smaller I think), in case you were wondering about the scale.
The second part was easy—machine a flat spot on the shaft so that the set screw would have something to grab on to and provide the necessary torque.

It turned out the scuff line seemed to be due to the rivet-thing that broke off, which then scratched the shaft as the shaft rotated but the gear stayed in place, which is why the flat spot goes right over it. I put everything back in the motor assembly to double check where it should go.
Anyway, once it was all back on, I tightened the screw as far as I could—the wrench is about three sizes smaller than the one that comes in standard sets. In fact it’s the smallest one I could find—didn’t want to end up breaking that, too.

And so far, it seems to hold up to the torque of having film and a lens in there—I went through an entire roll.
The battery problem is another issue. I need to find a way to measure the current. The two multi-meters I have don’t go fast enough; the try to average out the value to get a good reading and by then the cycle is done. I noticed that the battery I was using to do some tests with just the body throughout this repair process almost immediately died once I put a film back on the camera and ran it once. I don’t think my film backs need a serious lube job, though it’s possible I guess. I need to get my hands on the lubricants mentioned in the service manuals. Did I tell you I found them online for free?
One clever thing I realized (and then found on the internet as a suggestion) is to use the camera only with one battery at a time, so if it does run out mid-cycle, you can put in the other one to finish it off. I think on top of this I’m going to try to make a car-adaptor for it, and another one for when a wall outlet is available.
2 Comments
I just got an old Hasselblad 500 EL/M film camera, and I’m sure the batteries in it are dead. What is your suggestion for replacing them? Thanks!
Hi Tom,
The camera needs 6 volts. There are several options; two are described in
http://www.nic.fi/~sos/hasseli/hassy-acessories.htm
The 9 volt battery is okay to use I think because once the motor runs it will draw so much current that the battery voltage will drop; even then the battery just powers the motor and the solenoid that opens the shutter so I doubt 9 volts would hurt it.
I actually don’t like that 9 volt batteries are so expensive. What I did is I took the four-battery AAA holders (the plastic ones that hold four batteries in a square layout) cut the springs short and cut the plastic to make the assembly shorter. If done just right it will fit in the camera as is, but it’s pretty tight.
I would go with the 9V to test the camera. You can run it with the battery cover open as long as you run the negative terminal of the battery to the spring-loaded fuse that sits just next to the cover latch on the camera. The positive contact is at the bottom of the battery hole.
Post a Comment