Skip to content

A Python script to traverse a directory tree and ZIP all files with a given extension

Back in my days of heavy data generation I ran into issues keeping hard drive use under control. Manually making giant ZIP files of entire trees was not a good solution; the files would be huge and extracting small portions became too slow—not to mention the fact that some of the more popular compression programs out there could generate ZIP files that were too large to open (and thus the data was unrecoverable).

So I wrote this script to traverse a tree and create ZIP files of each extension separately. The script is executed with the first argument being the root directory (full path recommended) enclosed in quotes with the trailing slash omitted.

Compression is courtesy of 7-Zip. I guess I should mention I wrote this for Windows and it will require modification for use elsewhere.

  1.  

A quick way to fix “Chrome is already running” annoyances.

I use Syncback to backup my files on a schedule. At the end of the backup,  Syncback opens the HTML log file in your default browser. For some reason, with Chrome in Windows 7, this leaves Chrome processes running when I log in (even though I’m logged out when the scheduled backup runs). So I get the message that “my profile is already in use” or “there’s another copy of chrome running” even though I can’t see any evidence of it.

Of course it’s there in the task manager.

There’s a quick fix using taskkill. You can create a batch file, then create a shortcut to it, and put the shortcut in your startup folder. The only required line in the batch file is

  1.  

How to remove duplicate emails in Opera M2

Having used Opera’s mail client on my laptop recently (I got sick of Mozilla), I was very pleased with its simplicity. It felt like setting up Thunderbird took forever,with options scattered in two places, but Opera’s defaults suited me perfectly.

I decided to take the plunge and switch to Opera for my primary email client. That means importing thousands of old emails from Thunderbird. The import process was easy and seemed to go by without problems. After it was complete, I noticed several messages had been inadvertently duplicated—seemingly at random, and on all the accounts I imported. About 14,000 of the almost 100,000 emails were duplicates.

I figured out a relatively convoluted and somewhat hacked-together way to remove them. I learned some things about Opera M2 in the process:

M2 keeps a database with some basic information from each email, but the messages themselves are in individual files which are neatly sorted by date. When you click or double-click on a message Opera loads it from these individual files. However, it only reads as much of the file as it knows its size to be—that is, adding text to the end of the body in the file will not show up in the mail client. The size, subject, (and probably sender and receiver) are stored in a separate database file—this is the one that is accessed to add the messages to the list. So  changing the subject line, for example, in the individual files does nothing to the subject as it appears in Opera. If you delete the message file, Opera does not remove it from its database. Instead, it looks as though it thinks it only downloaded the headers and the message is still on the server. So I figured there was no way to delete the emails other than from within Opera itself.

If you’re going to try this, don’t be stupid—backup your entire Opera mail directory like I did. Also, remember these scripts were developed by examples in my email collection, so it may not work for everyone. And like any good programmer, I only added checks for errors that actually occurred when I ran the scripts.

First, I wrote a Python script to calculate the MD5 checksum of the messages. It wasn’t as simple as calculating it for the entire file because Opera adds some “X” fields to the top of the header. By trial and error I arrived at the noted fields as being possibly different between otherwise identical emails. I think it’s safe to just discard the first 7 lines and calculate the checksum with the rest, but it didn’t seem to go significantly faster. Remember you are opening every single email you have, so expect this to take a while.

  1.  

Next I loaded the resulting message-checksum list into a spreadsheet program, sorted it by checksum, and saved the results.

The next script loads the sorted list and looks for messages with identical checksums. It assumes there is only a maximum of 2 identical messages, though I believe the entire process would still work with n duplicates. It then saves identical pairs in another file. Note that along with comparing the checksums, it also compares the messages’ directories. I ran into at least one case where two actually “distinct” messages had the same checksum. Note that if you have a lot of short messages on the same day and account, there’s a good chance they’ll end up being marked as duplicates, and all but one will be removed.

  1.  

Next I had to devise a way of marking the duplicate messages so that I could filter them in Opera and then delete them. This turned out to be more difficult than I had hoped for, because the subject line is not read from the message files (it is in the database) and because anything added to the end of the message file will not show up in Opera because it only reads up to the size that it has recorded for that message in the database. So the only way to achieve this was to find the beginning of the body and add some distinctive set of characters. Then the end of the message (or an attachment) would be cut off at the end, but we don’t care since we’re going to delete these guys anyway. I found that in my several years of email collection, going from (I think) MSN mail to Outlook Express to Outlook to Thunderbird to Opera, a few of the older guys got mangled into bare headers without a message. I noticed some of these had been duplicated, too, but my scripts do nothing to them.

Finding the beginning of the body is a bit tricky. The header is separated from the message by a blank line. But if there are attachments, a MIME header follows. The body is then separated by a blank line after that. This script takes that into account. You can uncomment the “raw_input” line to allow you to stop processing in case you want to see what it will do to the first duplicate. Also, I highly recommend you run the script once through with the line that adds the marker to the messages commented out to make sure no errors occur during processing. I suppose it’s no big deal, but if for some reason the script stops (or you have to stop it) before it’s done, the messages that have been processed will be reprocessed the next time you run the script, thus adding the marker twice. I don’t think that’s a problem, but beware.

  1.  

After all the messages have been tagged, you just need to set up a filter in Opera to search message bodies for whatever you set “dupemarker” to. Once the filter has gone through all the messages, you can check that the number of messages found is less than or equal to the number of pairs messages with the same checksum (it may be less than if some messages had the same checksum but were in different accounts, as happened at least once in my case, or if they are blank, which also happened at least a few times). In my case, I had 14550 duplicate pairs of which 14391 were marked by the script.

Once the filter is done, select all the messages, and delete! You can keep them in the trash for a while if you’d like. Or, you can just keep them in the filter until you’re sure nothing went wrong. Remember that although Opera will not show the end of the tagged messages, or claim that attachments cannot be loaded because of parsing errors, the information is still there. If you remove the marker from the messages, Opera will be able to read them properly. This is due to the fact that Opera keeps the size of the messages separate from the messages themselves.

Good luck.

A quick way to boot into your other OS in a dual-boot system

NOTE: THIS DOESN’T WORK. Windows changes the ID number of the OS’s based on the default. So you’d have to do something more clever than this. The default OS seems to take over ID 1.

I have a dual boot setup—for all the wrong reasons. Regardless, it becomes annoying to have to reboot into the other OS by waiting for the menu to show up, because my computer has SCSI controllers which makes boot-up times extremely long.

With a quick web search I was able to put together simple batch files to switch the default OS and then restart the system (only works if you’re letting Windows handle the bootloading, of course). Create a new batch file (I put them on my desktop) and add the following lines:

bootcfg /default /id 1
shutdown /r /t 1

The first thing you need to do is open a command prompt and type in “bootcfg”. This will list your OS’s and their ID’s. As may be already obvious, choose the ID of the one you want to be default, and change the batch file accordingly.

The other line restarts your computer (/r) and sets the warning time to 1 second (/t). You may as well not have any warning, because you can’t stop it once it starts—although one trick may be to quickly open, say, a notepad file, make some changes to it, and don’t save. When the computer tries to reboot, you’ll get the warning that you need to save or lose changes—click cancel, and it may stop the reboot. It did for me, anyway.

Once you have this set up, you may want to reduce the amount of time you get to choose an OS in the boot menu. You can do this with bootcfg (try bootcfg /? at a command prompt).

DWFTTW Origins

Here it is—Andrew B. Bauer’s original paper, Faster Than The Wind, presented at the first AIAA “The Ancient Interface” symposium on the aero- and hydro-dynamics of sailing, April 26th 1969.

DWFTTW Update

Today I searched the ‘net to see how the discussions were going, and I came across this forum. Included are some pretty desired documents. One is a pair of papers by Andrew Bauer, arguably the true originator of the concept. One paper describes what is essentially a continuously tacking boat; the other is a boat with a water propeller connected to an air propeller, in which, depending on the direction of the boat relative to the wind, one drives the other or vice-versa.

Also interesting is a pair of analyses by renowned MIT professor Mark Drela. One is a derivation of the energy balance, applicable both to a cart or a boat, and the other, more complete analysis, is one based on efficiencies, the conclusion of which is that the cart should achieve speed faster than the wind relatively easily.

Case closed?

Directly Down Wind Faster Than The Wind (DDWFTTW)

Over a year ago there was an article in Make magazine by Charles Platt inspired by a YouTube video of a propeller-driven cart that allegedly could go down wind faster than the wind that was pushing it…. Everyone’s first instinct is to think “free energy”, or “perpetual motion machine”.

I was convinced that this was not the case, and that the cart could work. I had seen a similar cart presented by Paul MacReady, founder of Aerovironment. I remember him saying “this is the kind of innovative thinking we need to take the world forward”. The cart he showed was built by Andrew Bauer. There is a paper on it apparently, but I have no been able to find it. As described by MacReady, this cart would be operated in windmill mode, that is, the wind would be used to turn the “impeller” and drive the wheels until sufficient speed was achieved, then the pitch on the propeller suddenly reversed so that it is producing thrust, which would increase the cart’s speed beyond that of the wind speed pushing it.

The cart in the YouTube video, built by Jack Goodman, was a simpler design. Its drag alone would propel it forward, the wheels driving the propeller. At some point the cart would reach a speed at which the thrust would exceed the friction and it would accelerate to a speed faster than the wind that was pushing it. This is not a perpetual motion machine, since once the cart accelerates past wind speed, there is a relative wind vector acting against it (that is, there is drag going the other way) and it would achieve a terminal velocity which is greater than the wind speed.

At the time I was very frustrated by Platt’s treatment of the subject. I did not think his primitive construction methods were nearly enough to prove or disprove anything (although since then a very simple design has emerged). I wrote as such in the magazine’s forum and was challenged by Platt himself to build a cart. With the help of some friends, and guidance from Jack Goodman, I did just that.

cart-back.jpg
Back of the cart, showing twisted belt.

cart-front.jpg
Front of the cart. The battery pack and servo are for the steering.

The first test with my version of the cart (shamelessly copied with permission from Jack Goodman) was tested on the treadmill in June of 2008. But the steering was not good enough for it to easily stay on the treadmill for long periods of time. After some modifications and arduous waiting it still wasn’t good enough for several minutes of continuous testing, so we had to retort to some guide plates.

The treadmill test is scientifically sufficient to prove that, once at wind speed, the cart can exceed it. If a cart is going down a road at x miles an hour in x mile-per-hour winds, then the wind speed relative to the cart is zero and the ground speed relative to the cart is x. Thus the cart on the treadmill at x miles per hour is exactly the same situation. If the cart can move up the treadmill, or add tension to an anchor rope, as is the case in our tests, then that means that there is positive net thrust, that is, the thrust exceeds the friction and thus the cart can accelerate. The treadmill cannot simulate what happens after that (the relative wind goes from zero to against the cart) or before (when the wind is going faster than the cart). However, the first point is inconsequential, because we are not looking for the terminal velocity, just knowing that it is greater than wind speed. As for the second point, there are numerous ways to get the cart to wind speed if its own drag is not enough: imagine, for example, a set of hinged sales that open flat like a book when the wind blows from the aft and close into a “double flag” when the wind blows from the front.

One way to analyze this from an energy point of view goes as follows: imagine the cart has just reached wind speed; let’s call this state 1. At some short time later, the cart is at state 2. Between the two states 1 and 2, the cart’s kinetic energy change is
[tex]1/2m(v_2^2-v_1^2)[/tex]
and this energy change must come from the work done by the cart by any external forces over some distance [tex]l[/tex] covered in this time. The two forces acting on the cart are the thrust of the propeller [tex]T[/tex] and the overall resistance (friction, propeller turning drag, other losses) [tex]F_r[/tex]. So our equation reads
[tex]1/2m(v_2^2-v_1^2) = Tl – F_rl[/tex]
If the speed at station 2 is larger than that at station 1 (meaning the cart has accelerated past wind speed), then the quantity on the right side must be positive. That is,
[tex]T \geq F_r[/tex]
Part of the resistance comes from the propeller itself. It is essentially a rotating wing, so it has lift and drag, and the two can be related by the lift to drag ratio, which depends on a number of factors, but to some extent can be considered a design choice. If we call the ratio [tex]a[/tex] then our expression becomes
[tex]aD \geq D + F_l[/tex]
where [tex]D[/tex] is the propeller drag force, and [tex]F_l[/tex] are all the other losses combined. This inequality can be simplified to yield
[tex]a \geq \frac{F_l}{D} + 1 [/tex]
Note that if our losses are small relative to our drag, the lift to drag ratio need only be greater than 1—an easy task. Either the losses must be minimized (good bearings, low rolling friction, etc.) or the drag on the propeller must be increased. As bad as that sounds, what this really says is “or the propeller must be made bigger”, or “the propeller must be made to generate more thrust”, keeping a constant lift to drag ratio, of course.

There is another equally superficial analysis which shows that, if taken to wind speed, the cart immediately decelerates. However, initial short-time treadmill tests showed that the cart definitely moved up the treadmill at some speeds; it just wasn’t obvious whether it would do so continuously, or if it was only releasing stored energy or momentum from being held in place on the treadmill.

So it was essential that, in these tests, the cart be allowed to run on the treadmill “indefinitely”, to show beyond any doubt whether or not the net thrust it produced at certain speeds was constant or not. The answer seems to be a most definite yes.

The videos below are divided into two parts. The first probably shows enough for most people; if you’re a real skeptic, you can watch the second one which shows us changing the treadmill speed several times back and forth.

Part 1 of the test:

Part 2 of the test:

By the way, if you want to see other YouTube videos on the subject, search for DWFTTW and DDWFTTW.

Migrating from EarthLink Mailbox to Mozilla Thunderbird

If you or your loved one has suffered the unfortunate fate of having used EarthLink Mailbox as an email client, there is hope. I recently got sick and tired of that poisonous piece of software. A recent Spybot S&D scan apparently sent EarthLink Mailbox into a frenzy. One of the user profiles on the system was partially reset and EarthLink Mailbox decided to reinstall itself for everyone. Of course, for the one person who actually used it, it would no longer recognize the user “identity”, and it took some registry editing to get it to read its own data files again. So it was time to end it.

Moving your emails to Thunderbird or any other client with some form of actual import/export capability is possible, albeit very annoying. I found a few methods through a Google search, though it was hard to find anything at all.

First I tried the “synchronize local folder to an IMAP account”, which seemed pretty clever. The idea is you install a [free] mail server on your computer, create an account, access it via IMAP, then in EarthLink Mailbox you synchronize your local folders to the IMAP account. Unfortunately, this doesn’t seem to work in this version of Mailbox (“Product ID 2005.3.14.0”) because you cannot change the EarthLink account to IMAP instead of POP (and then lie to it and put your local server as the mail server).

Then I tried to select a bunch of messages, right click and select forward, then try to save the attachments as EML. I saw this described, but couldn’t understand how it was feasible because there was no “save all attachments” option. (More on this below.)

Eventually I just started doing the forward method, but sending the messages to a Gmail account, then saving all the attachments. The EML files themselves can be dragged-and-dropped into Outlook Express. (I didn’t try directly dragging them to Thunderbird.) I also tried forwarding them to my fake account on the local server I had just installed and then downloading them into Thunderbird, but for some reason the first EML file’s extension was changed to “txt” and the EML files themselves seemed to be infinite loops rather than the actual messages.

The problem with sending things to Gmail, aside from the horrible waste of time it is to transfer that back and forth, is the 20 MByte attachment size limit. If you’re forwarding too many messages or several with sizable attachments, you’ll easily violate this.

It was then that I realized that you can save all attachments to a folder from EarthLink Mailbox. You do as before—select a good chunk of emails at a time (I did from 300 to 600, depending on whether or not there were a lot of attachments. Right click on the selection, hit forward, and fill out just enough of it so that you can save it as a draft (the easiest thing for me was to simply close the message and ask it to save it as a draft).

Then navigae to the drafts folder, and select the email (do not open it, that is, do not double-click). In the header area of the email preview, there is an “Attachments” button. If you hit it, Mailbox has the audacity to create a menu on which each line is an attachment…. Scrolling will take forever, except that there is a trick! If you move the mouse so that it is over the first (or one of the first) item near the top, and then press the up arrow on the keyboard, it will loop back around and take you to the bottom of the menu, where the “Save [all] Attachments…” option is. In true Mailbox style, you cannot create a folder from within the browse dialog, so keep an explorer window open to create the folders in which to dump the attachments. Then you can just drag the EML files into Outlook Express, and, if Thunderbird is your final destination, you can simply import from Outlook Express from within Tools->Import.

Some tips:

  1. Although it would seem that you could save time by attaching a lot (say, 1000) emails at a time, don’t do it. It’s certainly not a linear process, and after 20 minutes of hard drive churn something will crash. So just be patient, and do 300 or so at a time (less if your emails have lots of attachments).
  2. For the subject line of each email-full-of-emails, I wrote the name of the folder, and some information about the last email included in the selection (in this case, the date and time). If you switch folders in Mailbox, it will not maintain your selection position, so this is a good way to keep track of where your selection stopped so that you don’t end up with duplicates.
  3. Although I didn’t do it this way, I recommend you finish saving all the EML’s to the hard drive first, then drag them into Outlook Express very carefully. If you accidentally drag into the wrong folder, and that folder already had stuff in it, you will have to reconstruct the folder from scratch (unless there is some clearly distinguishing property to distinguish the emails that were misplaced).
  4. I would create a backup of the Mailbox files first. I would also change the servers to non-existent ones before you start so that if you accidentally hit “check mail” or send, or whatever, it will fail. The Mailbox files are in the user profile in “Application Data\Earthlink\6.0\Identities” (where, I guess, 6.0 can vary). For situations like this I create a backup by compressing the directory without any compression at all using 7-Zip or something similar. It is fast and easy.

As a final check, you can verify the email count in the folders in Outlook Express matches those in EarthLink Mailbox. Of course if you find a discrepancy (there is one email missing from my inbox…) it is doubtful you’ll find what it is. If you care, you will have to redo that folder.

Note, also, that you lose any track of which messages are read and which ones aren’t. I don’t know what else you lose, but all the attachments are intact.

I just moved probably near 10,000 emails this way, and it took a while due to the exploration, but once I had it down I moved 4,000 of them in less than 10 minutes.

Python script to format the TDS B series CSV files.

In my last post I griped about the Tektronix TDS2004B spitting out horrible CSV files. I wrote this script to reformat it. As you can see from the source, whatever is in the “header” file just gets dumped ahead of the data. I just checked it and it should work with 1, 2, 3, or 4 channel files.

  1.  

This should get you started.

A user’s review of the Tektronix 2004B

So a few months ago I decided to buy an oscilloscope. It’s a nice tool to have, and I certainly would be using it, especially in the insect-camera project.

I wanted connectivity to the computer for sure. But I wasn’t sure I wanted to always have a computer; that is, I prefered a stand-alone device. My bandwidth requirements are not stringent, but, having used two-channel scopes in the past, I wanted to try to get one with four.

In my price range, then, there were really only two options: Tektronix, and Agilent (who now makes the Hewlett-Packard instruments). I had used an HP before (some $15k model) and was surprised to find that, at least at first glance, Agilent has done little to change them: they are still relatively large (especially compared with the Tektronix). (Note: since I bought my scope, it seems that Agilent has changed a few of the lower-end models; moreover, there is no equivalent to the Tektronix model I ended up choosing.) I’ve used plenty of Tektronix scopes, and frankly, the really short depth is a nice feature. If you open one up, you’ll be surprised to find how little is in there (at least in the lower-end models) and that they could have probably made it even smaller had they not made it flexible in terms of accessories.

I settled on the TDS2004B; B meaning it comes with a USB interface (both host and device). The host interface allows you to download pictures and data (I think) directly to a USB memory stick; the device interface is for connecting it to your computer and downloading screenshots and samples that way.

As expected, the unit is very small. It is certainly portable—well, of portable shape. So on with the main points:

Color Display

The display is horrible. First, they put a sticker over it that says one must go to their website to activate the warranty, and, well, it left residue on my screen. Nothing too serious, but at $2k a pop I think anything stupid is serious. But as I said, the display itself is pretty bad. This is the old-school TFT that disappeared off laptops almost as soon as it was invented. It is slow to respond, blurring fast signals, and it has a viewing cone some 20 degrees off vertical (you have to be looking right at it at the right angle to see anything). I was surprised to find I could see it outside in the shade, but only by changing the contrast to zero—that’s right, it’s extremely counter-intuitive, but turning down the contrast makes the display easier to read. It defaults from the factory to invisible. Luckily, a lot of the functions that can make use of a knob for settings do, and a multipurpose knob on the unit has an indicator LED that lights up when you can use it to change a setting.

Portability

This thing may be portable in that it’s small and light, but there’s several problems with that. First, it doesn’t come with a cover. Before the 70’s it seems every instrument had a cover. Now, that apparently is a waste of money. So you’ll be carrying your scope around with all the knobs and the display exposed. Tektronix even sells a soft carrying case so you can see the damage only after you unpack it. I’ve just now discovered that if you’re willing to pay $650, you can buy a hard case for it. It is nothing but a Pelican with custom foam and fits all their oscilloscopes, which means it fits none of them well. Funnies thing is that you’re supposed to put it in the soft case (some $80) before you pack it into the hard case. So you buy a portable scope, but there’s nowhere to put your probes, power cord, or USB cord, and nothing to protect the knobs or the display. A Pelican is really just overkill for storing the instrument. A simple hard plastic cover for the front with a couple of latches for chords would have been nice.

Connectivity

The USB is a joke. Unless you’re going to monitor traffic and write your own driver, all this means is that you’re stuck using their horrible software. I’ve used version 1.5 and am really surprised that they actually update it (v1.6 is out as of now). You can also get “SignalExpress” for use with LabView, and as is common with National Instruments software, the download is an atrocious 300 MB. This “OpenChoice” software is a classic example of programmers being made to waste their time (see below). It serves as the interface on your PC to the device; the functions I’ve used include downloading the currently displayed sample both as a CSV list of values or as a JPG. The JPG is pretty useless, I thought—until I saw the CSV file.

tek_csv.png

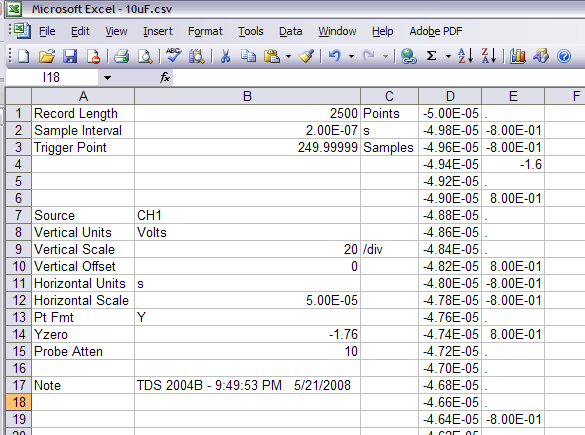
I foolishly thought, “Why would anyone want a bitmap of a plot if one could have the full data?” The reason, as the screen shot of one of the files open in Excel shows, is the extremely awkward and dysfunctional formatting of the CSV files. The presence of text is, of course, a big no-no for directly loading into programs like MATLAB or Tecplot. MATLAB may have an excuse, but Tecplot really should be able to handle whatever you throw at it, but that’s another story entirely. The first thing to notice is that information about the data is stored in the first three columns of the first 17 rows. The fourth and fifth columns are data. Had the data been recorded physically isolated (by lines) from the header information, it would be easy to ignore it or cut it out. Instead, an annoyingly “sophisticated” parser has to be written to extract just the data from the file.

But it doesn’t end there. Obviously when using a spreadsheet program it is easy to plot only the data in certain columns. The problem is that, for some reason, many of the data points that are very close to 0 in magnitude are recorded as a period (“.”). I guess that perhaps it is to distinguish them from a real zero measurement, but I really couldn’t care less. You can’t plot this in Excel, because “.” is not a number.

So the reason for the image capture emerges: if you want to see your data ever again without writing parser scripts, then you better save the image capture for it, too. Too bad the USB interface is one of the slowest I’ve seen—it takes a full two to three seconds to download one “record” from the scope.

The bit about programmers being made to waste their time is in regards to the UI of the software. Unbelievably enough, it uses entirely custom widgets which, of course, do not adhere to Windows standards, such as pressing “TAB” to move to the next field. Even worse, there’s a text field where you can write a comment on your image capture before saving it. The editor does not allow you to type in the middle of the text. That’s right—you can’t move the cursor somewhere and start typing. It doesn’t even overwrite—it simply refuses to accept characters there. The only way to type in the middle of something is to backspace from the end…. There’s a few bugs, too, including the fact that sometimes, when saving a CSV file, it asks for the filename twice (and saves the file twice).

General Design

The scope includes two foldable feet (like some keyboards) to adjust the angle of the unit relative to the surface it’s sitting on. This is absolutely necessary since the display has a very narrow angle of view. The problem is that it only solves the issue in one direction (when the scope is below your eye-level), and the feet are very close to the edges of the unit so if it is not sitting on a surface at most some 2 inches narrower than the scope, they won’t do anything. Many times I’ve found myself stacking the scope on top of other instrument boxes and, well, not many are as wide as the scope. It would be nicer if the feet were closer to the center—or just a huge bar across the whole thing—or, if instead of feet, they made the display sit in a platform so it could be tilted up or down independent of what the scope is sitting on.

The Nice Parts

There are a few nice things about it. The probes it comes with are really nice, and they give you plenty of color-coded wire clips so you can color away all your other probes (if you have any). The probe wires are skinny, though, so there’s few other cables you’ll be able to tag with the clips.

And hell, it’s a nice tool to have. It’s just clear that it suffers from the cheapening disease that plagues everything these days. At least this was a cheap model; these things would be unforgivable with a $10,000 unit.

Conclusion

I don’t have any experience with any of the new scopes from anyone else (Agilent). One thing I would urge is to seriously consider skipping the USB option, unless you think you are really going to need to dump data to a flash drive. Although the specifications are quite cryptic, I believe some of the newer pre-USB models had a serial interface, which is much better in that you can write your own software for it much more easily. Had I known the USB was slow and their software was so miserable I definitely would have gone for it. The best thing to do is to call them. Check the stock on TekSelect, their new-old-stock/refurbished sales central. You should be aware that it doesn’t matter where the instrument was made for, they all have a universal 120/220 power supply. The only thing that changes is the language of the manual (which is downloadable anyway) and the prongs on the power cord (they all use the standard computer cord). You’ll notice the savings on the non-USB models are astounding. In fact, I could have upgraded to the 100 MHz version of this and still saved $300 had I given up the USB—and it would be a new (old stock) unit, not even refurbished! As far as I can tell, to have any connectivity with the pre-USB models, you need something like the TDS2CMAX module, which seems to run around $300. There’s also a TDS2MEM module which adds compact flash card for memory. The TDS series programmer’s manual is the only way to get at what the modules can do, but it certainly seems they can grab images and transfer data. (If the manual link is dead, try this link.) The manual implies it also applies to the B series oscilloscopes; looks like I have some exploring to do.

Well, I just did some exploring, and it seems that the Tektronix scopes, along with Agilent and other instruments comply with the USBTMC protocol (USB instrument control) and there are free libraries available to program such devices through the VISA API. One library is available from Agilent; National Instruments has NI-VISA (I haven’t tried either yet). Beware as it seems there is a pay version as well as a free version of NI-VISA.