Skip to content

Sunpak 622 Service Manual

So I found a free copy of the service manual for the Sunpak 622 flash. Wow, that thing is complete! More of a circuit diagram/exploded view kind of reference than a service guide, but useful nonetheless. I found it here.

I couldn’t resist

Well, yesterday was my last flapping day. So Thursday night I came in and decided to fully automate the thing, as was my original dream. I inspected the new belt and it seemed to be holding up much better than the previous one.

They are different types of rubber; both with fibers embedded in them for extra strength. Of course I don’t know what the rubbers are called, but the one that broke looked like black rubber whereas this one looks like shiny plastic.

Anyway, if you’ve seen the movies, you can see that the first half stroke of the “C2” program ejects some sort of vortex. For my ultimate automation experiment, I figured I should try to capture this ejection of vorticity in as much detail as possible.

As before, I wanted to average several “runs” together to get a higher resolution data set. I can in theory do this because the mechanical movement of the flapper is more or less repeatable and because the motor controller I “made” out of an Atmel AT90USBKEY was designed with this in mind. When I tell the controller to “go”, it sends out a trigger pulse and a precise time later starts the flapper moving. This trigger is then used by the timing program I wrote (which drives a National Instruments PCI 6602 card) to spit out a “burst” of triggers at 7Hz which ensure that the 3D camera is perfectly synchronized with the laser—in other words, a $600 flash sync chord which requires a computer to operate.

In my previous experiments, I would set the delay between receiving the trigger from the motor controller (“trigger out”) and the start of my burst manually, then run that 30 times, and when it finished, I would change the delay and start again. I did four different delays for “C1” and “C2”, so that in the end the assembled movie will look like the camera was 28 (7 * 4) frames per second instead of just 7.

So in this ultimate automatic concoction, the delay between trigger out and burst start is set by the Python script which does the recording. There are 10 different delays, so that the camera will seem to be 70 frames per second in the final movie. Each “phase” as we call it is again repeated 30 times, so now we have 30 * 10 = 300 repetitions of the flapper. Each repetition is 21 frames; I wanted to only record the first stroke and a few more frames to see where the ejaculation ends up and if it changes shape (and hopefully 21 frames is enough, since I haven’t processed it yet). So the total number of images for this experiment was 21 * 300 = 6,300, each is 24 megabytes, so we’ve got 6,300 * 24 = 147.6 gigabytes of images alone. I suspect by the end the processed data will be around 170 GB, and probably will take one or two months to process (one month if I coordinate several computers, two if I only use one). Hopefully.

For full automation I also wrote another script which would watch the output directory and whenever a run was finished it would move it to another computer. And in theory this script could have also started processing, but all the computers in here are still choking from the massive amount of data I produced this week so there was no way it would work out.

In the end, I only had to manually restart it twice, both times because of a weird recording glitch where the recording software sits there forever waiting for a frame that will never arrive.

Even if this last data set is no good, I’m happy that it was “fully automatic”.

That thing I’ve been doing

So I’m trying to graduate this year, but simply getting my thesis done isn’t my style. It had to be automatic, or something.

Over the past 5 years I’ve been working on the development of a camera system to measure flow velocity in three dimensions. The nerd-lingo designation would be “3D3C”, that is, three-dimensional measurement domain and three components of velocity. Technically, since the system is instantaneous, that is, you don’t get the third dimension by scanning, I could make my bologna bigger if I said “4D3C” denoting then the fourth dimension as time. However, I like to keep that in my back pocket and only pull it out after serious threats have been made to my skillz.

We buy the lenses and the CCD cameras, but the 3D camera itself I designed in Solidworks, and the CAD model is, of course, automatic—that is, I can type in three or four numbers as key dimensions in one part and all the other parts and corresponding screw holes move to the right place. These three or four numbers come from a design program written in Mathematica that I don’t like to talk about because it’s not automatic.

Here are some renderings of how the camera would have looked had the idiots who anodized it not almost completely ruined it.

camera.jpg

But enough about the camera. The way it works is, the user sets up his flow of choice in a water tank (or oil tank, or whatever, but usually something around the density of water) and you fill the tank with a carefully eyeballed amount of microscopic reflective beads—in my case, a probably toxic fluorescent powder made by Kodak that doesn’t exist anymore (and there ain’t much left in the jar). Then you shine a bright-ass laser—the same kind used to remove tattoos—expanding the small beam to a cone or cylinder that covers the measurement volume. The laser is nothing but an extremely fancy flash to freeze the motion of the particles in each picture.

The scene is imaged through three lenses at a time, and two such picture “triplets” are taken at a precise time difference from each other, which, after running through the 7-years-in-development software, spits out a vector field of the displacement of the particles from one triplet to the next. And, much like high school physics, the velocity is simply the displacement divided by the time [between the first and second triplet].

To prove this isn’t all just a lie I made up to impress my SWG buddies, my thesis experiment consists of imaging the flow generated by a solid flap—or as I like to say, a microscope slide bolted to an R/C servo. Well, not quite bolted, since there is a belt between the two, but whatever. Here’s what the experiment looks like while it’s running:

dscn5118.JPG

The first time I tried it it flapped too fast and the glass broke. Super-#$#%^-sonic, dude.

So what’s so cool about this? Nothing. Does it make the rice cheaper in China? No. It doesn’t cure cancer, either.

What is cool is that, as I mentioned, it’s been automated. Aside from mechanical failures, I can run experiments 24 hours a day, and start them from anywhere in the world with an internet connection. The software that actually records the images from the camera to the computer’s hard drive is run by a Python script which first runs a program which sends trigger pulses to the lasers and camera to make sure they are synchronized, then it activates the servo controller to move the glass slide in a certain way, which sends out a “start” trigger to the laser synchronizing program, records a set number of frames, shakes the slide back and forth to get rid of any bubbles that may accumulate, exports the images it just recorded to a set directory, then waits 10 minutes and goes again—a total of 30 times.

The timing program I wrote specifically to be versatile but also with automation in mind; once it fires the lasers a set number of times it quits. The motor is controlled by custom firmware I wrote for an Atmel AT90USBKEY which is half custom-written servo-controlling software and half ripped off Atmel’s sample software so that it behaves like a COM port. So the flapper can be controlled from Hyperterminal in Windows via an old-school style interface. But I also wrote a program to send commands to the COM port from the command line, so that the Python script can run the motor controller. This program crashed once and I had to physically come in here and unplug-n-plug the USBKEY to reset it, since for some reason Windows had lost the COM port put forth by it. Wish I had an internet-ready unplug-n-plug robot.

The Python script outputs a log to the web [link no longer available], which, along with a web cam that sees nothing but black most of the time (and a few spurts of green and purple while the lasers are actually on), can in theory be used to make sure everything is still okay.

After an experiment is done, I copy all the images to another computer for processing, which takes up to 90 minutes—each experiment is 1,530 images each 25 Mbytes in size, and the acquisition computer’s only got a 100Mbit connection. The images go to whichever of the other computers are not busy already processing and have enough disk space. The processing is also automatic; I use the same processing parameters for all experiments so that also runs off a [separate] Python script. After processing, another script is there ready to put the images in a ZIP file and then delete the uncompressed ones.

In theory it would be possible to connect all the automatic steps into one giant automatic thesis. For example, in the 10 minutes of waiting between cycles, I could already copy the images already exported to the computer which will process them, and start processing them. But that would make me obsolete, and so far, I’ve done 5 or 6 experiments and only 2 are good. The rest failed either because of an unreported recording error (meaning there is an internal error I don’t find out about until I look at the images) or because apparently the timing belt I was using is not meant to be in water for days at a time, because it dissolved-broke.

But the two that worked worked. You can see what years’ worth of work amounts to in rendering science by watching these movies [link no longer available] of legitimate unbuttered data. They are vector fields with color-coded velocity contours. The vectors are just one slice through the midline of the glass slide, since showing the whole volume at once is completely useless. The glass flap itself is not in the movie, but you should be able to tell where it is. I call it unbuttered because I haven’t yet grinded on the fence of ethics to make the data look perfect like everyone does before they wear it as a T-shirt to their favorite class.

Update 2008-05-09: you can go here to see the butered movies. These should be viewed with the red/blue 3D glasses. The one with “vorticity” in the filename shows, in short, the axes of rotation of the water as the flap moves it. If it were a movie of a perfect smoke ring (“vortex ring”), then you would just see a circle (the axis of rotation of the smoke in the smoke ring). The other movie shows, sort of, the path the water is following at any instant.

Anyway, make sure you keep going to the website [link no longer available] to stare at the blackness of the web cam’s perspective: after this week I won’t be doing any more flapping, and will instead do some scientific squirting that doesn’t require automation. Remember to refresh every so often to update the log! How exciting.

What would I do to make this better? For starters, I would have a lamp on a computer-controlled switch so that I could see the flap while the computer was waiting 10 minutes—that way the web cam would actually be useful in trying to check for damage.

By the way, setting up the web cam was easier than spitting at a snail from ground level. I bought a “Microsoft LifeCam”, which seems to me should be called a “NoLifeCam” or “PornCam” (because, really, what else are they for) and wrote a really short Python script using the VideoCapture module. The Javascript to display the web cam images came from some guy who I’ve linked to on the page. Do yourself a favor and stay away from that Firewire #$#$, especially expensive stuff like Apple’s LameSight. It’s not worth the hassle to try to make it work in Windows. Not that the Microsoft PornCam is any better, since you have to install like 100 megs of software to get the damn driver, but at least it’s cheap.

Something New

I haven’t done anything lately, but I’ll start posting some new stuff soon.

But most importantly now I want to mention a new link I added, one to a website full of manuals. Idiots sell manuals to old cameras and equipment online for 100% profit and it’s most likely completely illegal. I got sick of it. Found this guy, and donated $20. Best $20 I ever spent.

You search for manuals on Google and it’s littered with stores with horrible prices and eBay auctions from thieves.

Don’t pay for manuals! Go see Mike instead. And if you’re selling stuff without manuals on eBay, put a link to his site on your listing!

Dead Hard Drives 2

I should have thought of this…

I did a quick search on the Internet for “hard drive platter transplant” and it lead me to a link on hackaday about doing such an operation. The article itself seems to be crap; the important part are all the comments left. There are a few people who seem to know what they were doing. (The cryptic “freezing the hard drive” makes no sense and it seems most people talking about have no idea what it does.)

Though it is unclear at this point exactly why my platter transplant failed, here are some ideas:

1. During normal operation, the platters are fixed in position relative to each other. Thus any data written to the drive most likely depends on this relative position. In this particular hard drive, the only way to remove the platters without altering this alignment would have been to remove them with the motor, which is screwed to the chassis of the drive via three screws that sit directly beneath the third platter—in other words, milling the chassis on the back side until you get to the motor flange would have in theory released the whole assembly together, at which point maybe (in theory) you could have dropped the three screws out, tapped those holes with a thread, then drill the appropriate clearance on the second chassis (with the working head) so you could screw the motor in from the outside. This is a very sketchy plan, but it may actually work.

2. If indeed there is a “calibration” between the head and the platters, then by loosening any component inside the drive you are screwed. Frankly I still find this hard to believe—for example, my car has electronic throttle control so the traction control can close the throttle opening on its own regardless of the gas pedal’s position. I have read that the minute you start the car, the throttle valve opens fully and then closes to idle so that every time you start the angular position sensor is calibrated. It would seem that the hard drive would have some sort of fail-safe system like this—something that would tell the heads, “okay, you’re in parked position now, so scan the platter and look for pattern XXX to know where the hell you are.” Then again, the ^&#^$ should have put some surge protection so you don’t fry the ^%#^$ heads.

3. According to the comments on the hackaday article, and my own intuition, the clean room is not a necessity. Especially after seeing how much wind the platters generate when they are spinning, I can’t imagine that as long as you don’t leave it sitting in a barn for a week how it wouldn’t immediately clean itself upon spin up. (Of course at some point I was blowing a platter with canned air and it suddenly condensated which left a nasty stain on it—probably not good.)

In conclusion—I’m willing to bet it’s the platter alignment issue. I doubt as it was suggested by a friend of mine that you can somehow get some software that reads entire platters blindly rather than trying to read the actual data and then run it through some crazy #$%# to “reconstruct” the data from these images.

In any case any chance of trying it is done as I purposely scratched the hell out of the first platter.

Dead hard drives

Here’s something I can do with them!

(read here)

Hasselblad 500 EL/M Adventures, Part II

In continuation to my first post in the series….

By reading the above post you will see that my 500 EL/M broke when I tried to remove the lens. The way I had left it, I had epoxied the gear back onto the shaft which held up—until I put film in the back, and the glue immediately broke off.

So I knew I was going to have to do something better than that. I took the whole motor assembly apart, and yanked the gear off the shaft:

hass.jpg

If you look carefully on the shaft, you will see a shiny line around the shaft near the tip on the lower left—this is scuffing caused by the shaft spinning but the gear not going anywhere, and conveniently marks where the gear should be mounted. The circle you see right next to the line is still a mystery.

Looking very closely at the gear, it seemed as though it had two rivets of sorts to hold it onto the shaft, and this circle must have been where one of them attached. I have no idea if they were welded, glued, or what. Certainly not a good way to hold a gear onto a shaft, it seems—or maybe Hasselblad built it in as a safety feature? (Damnéd hard drives.)

In any case, I decided the only way I was going to fix this was by putting set screw(s) on the gears and machining a flat spot on the shaft for them to make good contact. One of the mini-rivets or whatever was slightly sunken in from the outside of the gear, which allowed me to stick a drill bit in the very edge of the hole instead of starting a new hole out.

Because of the diameter of the gear, and the short length, I couldn’t get a center-drill that I could hold in a chuck to clear the gear while marking for a new hole, so my only hope was use the rivet holes, enlarge them as little as possible, and tap them. The tap size was also a constraint, since if it were too big in diameter, it also would not clear the gear diameter. The best solution I could find was to use a 0-80 screw. They are tiny (you will see).

I couldn’t find a drill of the correct tap drill size for 0-80, so I went with a slightly larger diameter bit. I put it in a small chuck and by hand drill into the rivet hole, which pushed the rivet through to the bore of the gear. I kept going and drilled across both holes from one side, pushing out both rivets.

Then came the tap… which didn’t quite clear the gear. I could get most of it in, but where it tapered out to fit in the standard holder it was hitting the gear and pushing the tap at an angle to the hole. I sure as hell didn’t want to break the tap that wasn’t mine, and I wasn’t even supposed to have access to. So I went as far as I felt safe, then put in a socket-head 0-80 screw and figured if there was only one or two threads left to cut I could do it with the stainless-steel screw on an aluminum gear.

Nope.

Sheared the head right off:

dscn4628.jpg

You can see it almost looked like I could get some pliers and pull it out—but it was jammed in there. That side of the gear hub is flattened a bit, as you can see, which makes me think maybe this wasn’t the first repair on this camera… though I believe I am the second owner and it was barely used.

Luckily I had one more chance with the other hole. I just carefully persisted with the tap. Going very little at a time, then backing out, etc. Eventually I got through and had a nice threaded hole:

dscn4630.jpg

By the way, the gear is about the size of a quarter (a bit smaller I think), in case you were wondering about the scale.

The second part was easy—machine a flat spot on the shaft so that the set screw would have something to grab on to and provide the necessary torque.

dscn4632.jpg

It turned out the scuff line seemed to be due to the rivet-thing that broke off, which then scratched the shaft as the shaft rotated but the gear stayed in place, which is why the flat spot goes right over it. I put everything back in the motor assembly to double check where it should go.

Anyway, once it was all back on, I tightened the screw as far as I could—the wrench is about three sizes smaller than the one that comes in standard sets. In fact it’s the smallest one I could find—didn’t want to end up breaking that, too.

dscn4648.jpg

And so far, it seems to hold up to the torque of having film and a lens in there—I went through an entire roll.

The battery problem is another issue. I need to find a way to measure the current. The two multi-meters I have don’t go fast enough; the try to average out the value to get a good reading and by then the cycle is done. I noticed that the battery I was using to do some tests with just the body throughout this repair process almost immediately died once I put a film back on the camera and ran it once. I don’t think my film backs need a serious lube job, though it’s possible I guess. I need to get my hands on the lubricants mentioned in the service manuals. Did I tell you I found them online for free?

One clever thing I realized (and then found on the internet as a suggestion) is to use the camera only with one battery at a time, so if it does run out mid-cycle, you can put in the other one to finish it off. I think on top of this I’m going to try to make a car-adaptor for it, and another one for when a wall outlet is available.

iRevenge

Heh. It had to happen….

As you may or may not know, I recently made some discoveries that allowed me to put my iTunes library on a portable drive and update my iPod wherever I wanted, truly making my library mobile (and not just my MP3’s).

I always wondered why computer hardware (cases, motherboards, graphics cards) are so apt to being made by some random chinese guy in his closet. For work I try to buy “brand name”, which doesn’t really mean anything in the computer world, unless you buy something pre-built so you at least have tech support. But the type of computers we get are too expensive and customized to get this way.

I was also wondering when this world would all bite me in the ass. Well it just did.

Recently I had taken some MP3’s from a friend and merged them with my own. For weeks I matched genres, relabled artists, etc.—even wrote a program to help me do it, catching spelling mistakes (by a stupid similarity comparison, nothing fancy). Anyway, kudos again for Apple recognizing some people may have better ideas than them and having the iTunes COM interface.

I had them in a 250GB drive in a crappy-ass enclosure, which was the least ugly I could find. I won’t even include a picture of it. It is such a piece of crap. They make the enclosures nice and thin and then give you an AC adapter that is almost the same size.

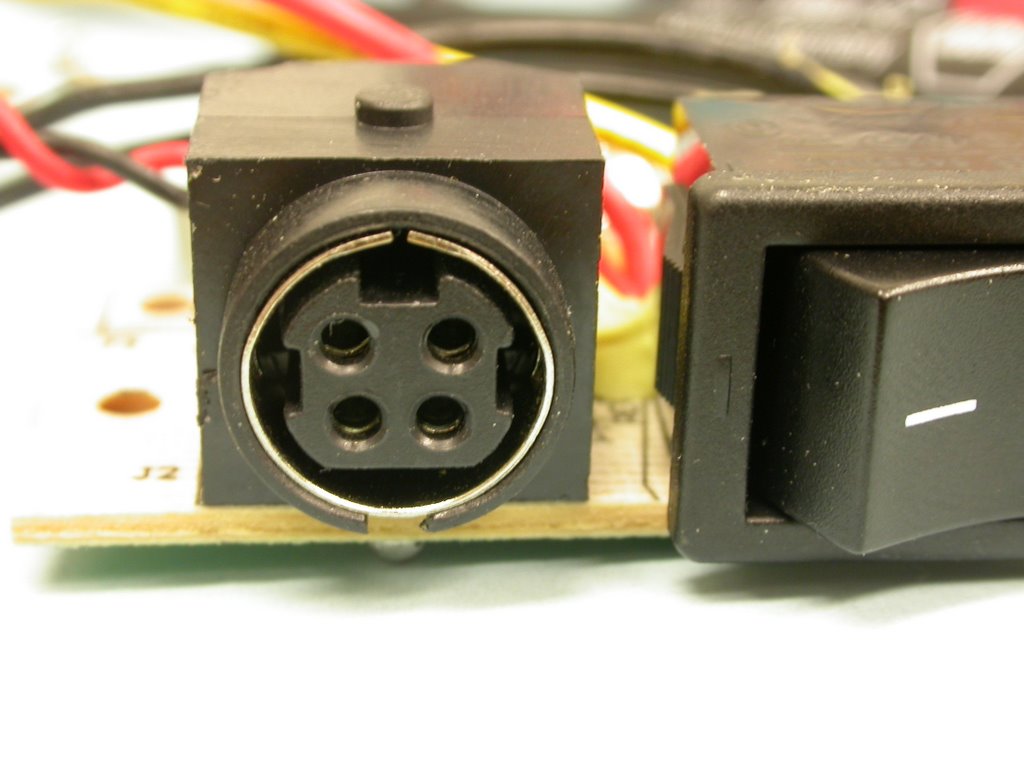
Anyway, the enclosure has a 4-pin power socket. So does another, even crappier enclosure I have at work. It is pictured here.

dscn4700.jpg

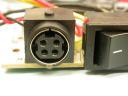
I brought the MP3’s from home, but forgot the AC adapter. “No problem,” I told myself, “I have another one here.”

I plugged it in and it did nothing. Perhaps subconsciously suspecting what had happened, I beat the living @#$% out of it and smashed it into a million pieces. Hours later I went home to get the AC adaptor that came with the case, and again, it did nothing.

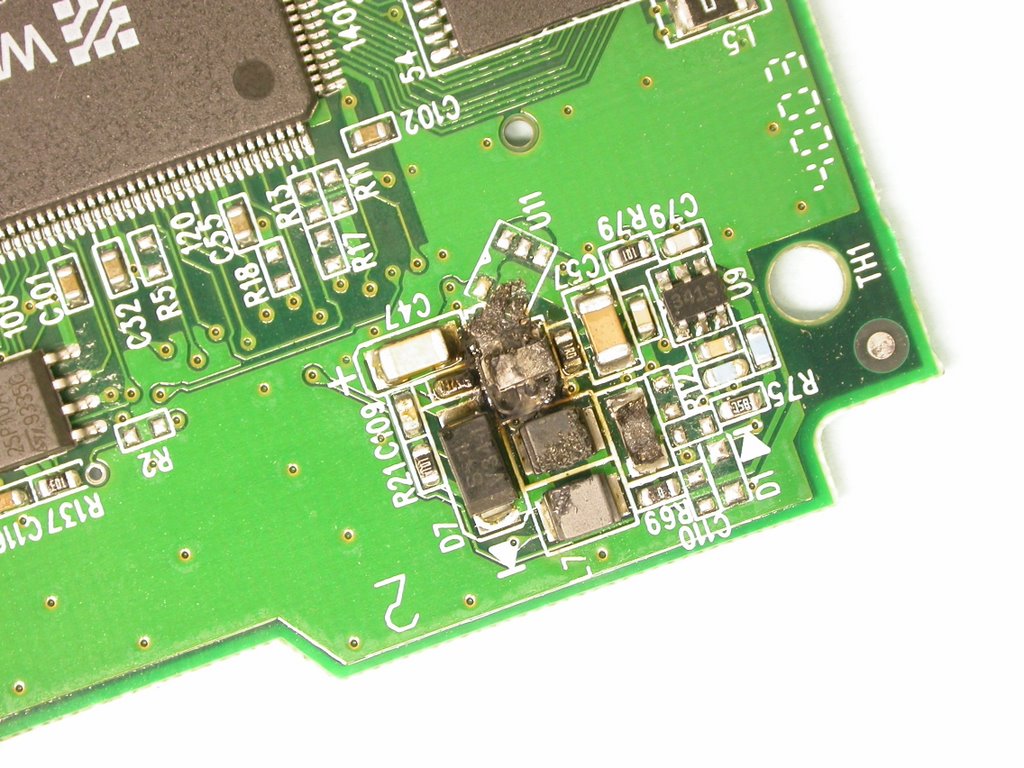
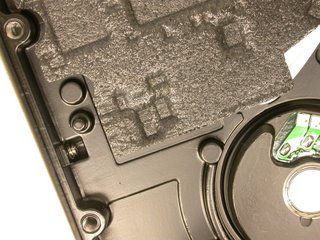
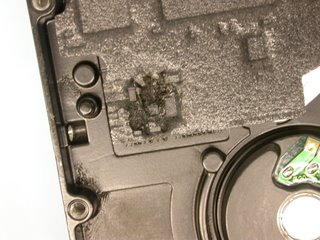
Then I opened up the case, and smelled the burnage. “Good,” I figured, “I blew some capacitor in the enclosure.” Nope. Blew one (or something) on the god-damnéd hard drive circuit:

dscn4652.jpg

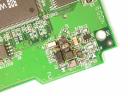
See the damage? It left quite a crater in the foam between the drive chassis and the board, too (first, undamaged drive, then, my %@#^$%^ drive):

dscn46550.jpgdscn46560.jpg

I figured I could just take the circuit board from another [identical] drive and replace it, at least to get the data off then throw the whole thing in the trash. Nope. Didn’t work.

Then I got stupid, and decided to transfer the platters from my dead drive to a good [identical] drive to read the data off it. I could have gone to a clean room to do it, but I figured: the worst a bit of dust could do is screw up a few sectors, and I may lose a few files….

Of course it didn’t work, but I took pictures, so here we go.

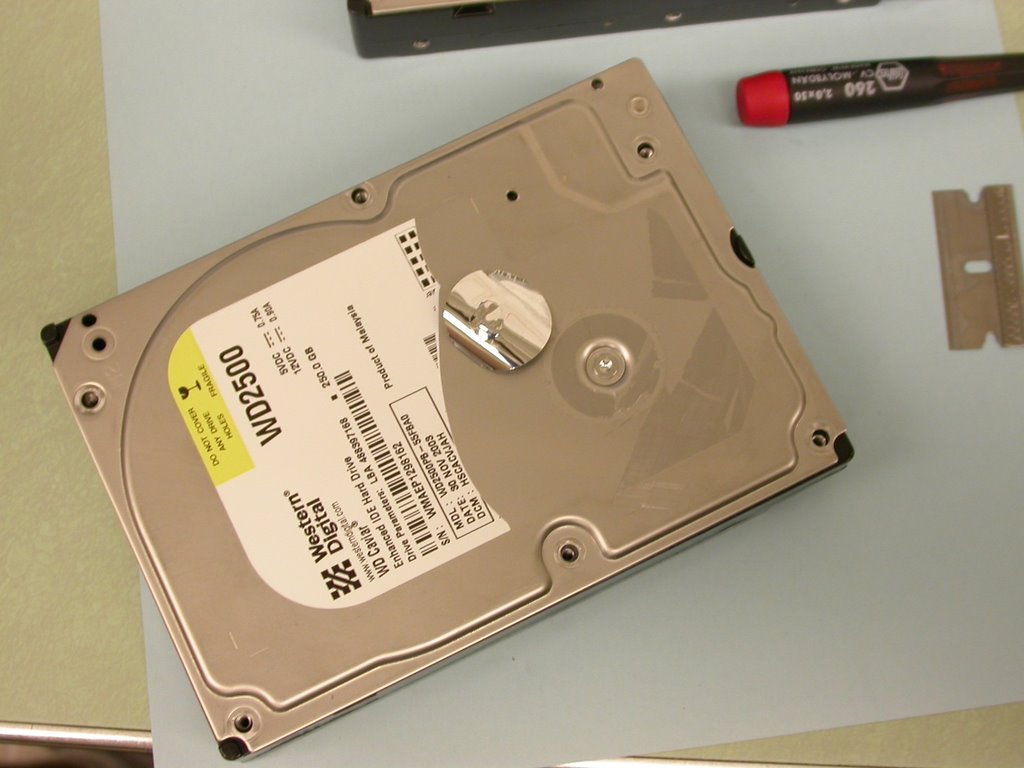
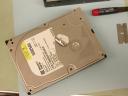
First, a note about removing the case: there was in this drive (and I suspect most others) a hidden screw beneath the label, covered by a silver sticker, which is the “warranty void if removed type”. Basically, if you see any warranty stickers, there will probably be a screw beneath it:

dscn4661.jpg

Also, I think most drives use star-drive (torx) screws all over the place, so get a good set of torx screw drivers. Wiha is a very famous brand for screw drivers; I have a phillips set from them to take lenses apart. The torx driver I used was a Husky, which is annoying because it can’t keep all the tips enclosed in the back (one must always be mounted) and one of the tips on my phillips version broke.

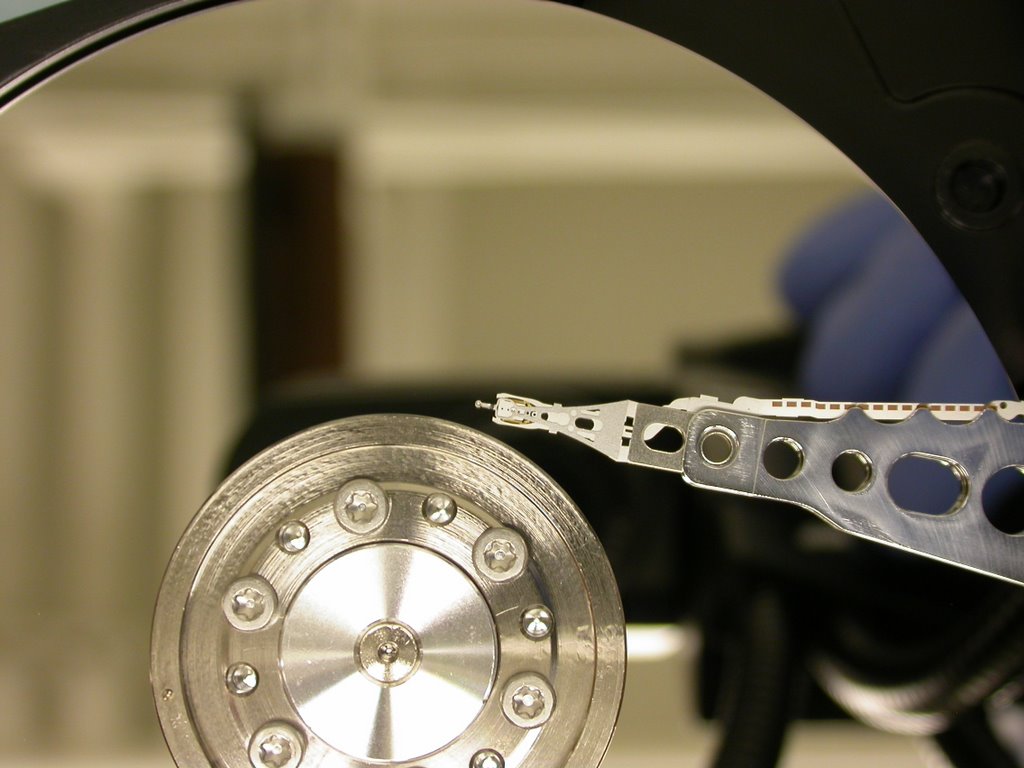
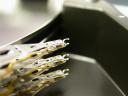
This drive had three [double-sided] platters and six heads. The platters are like super-shiny thick CD’s, and the heads are magnets with some tiny wires mounted on something that looks like a miniature crane:

dscn4665.jpg

The platters are actually held on by pressure alone. The plate you see with the seven screws at the center of the platter just bolts directly to the spindle motor’s bearing, pressing the first platter against a spacer that presses the second platter onto the spacer of the third which presses against the bottom of the bearing. So once this top flange is removed, the platters are loose.

But to remove them, you have to move the head out of the way, past a plastic stop that keeps it from going off the platters during normal operation. Why? Because once they do, the head magnets stick to each other:

dscn4675.jpg

And then when you try to put them back on the platter, unless you have six hands or make a tool, you have to scrape the edge of the platter to try to split up the magnets and get them to go back on. When the drive is off the heads are “parked” near the center of the disk where there is probably no data. There’s probably none on the very edge of the platter, but it must start pretty soon.
Unfortunately there is also a little plastic piece whose purpose I don’t understand. It has three arms that interlieve with the platters and is somewhat free to rotate but immobile under normal operation. It may be something they use at the factor to put the platters down with a robot, I don’t know—but you can’t take it off without removing the head assembly, so getting the platters out is a mess.

Well, end of story, I transplanted the platters and when I turned on that drive the head was just going all over the place, frequently hitting its limits as if it were trying to read something off-disk. Clearly the transplant didn’t work, though I wasn’t clear if it didn’t work because I damaged the platters or because formatting actually “calibrates” a head to a set of platters (sounds ludicrous to me now)—I don’t know anything about hard drive technology, so if anyone knows, drop me a comment.

I tried putting the head of the one I blew up in the working one, but it wouldn’t power on. So apparently I fried the head, and so the drive never turned on from its “standby” state. Unbelievable how unprotected these drives are against electrical problems!

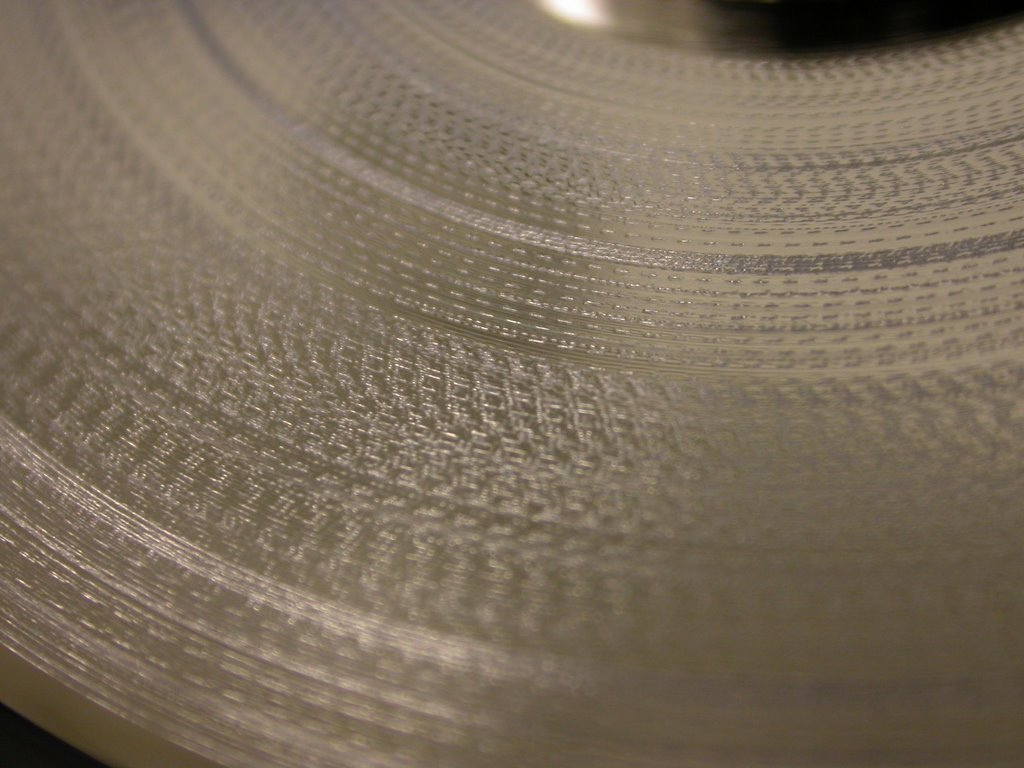
Then for shitty giggles I ran the drive with the cover open. WOW it makes a lot of wind. It’s like a good computer fan! It blew the dessicant packet they put inside the drive case away. It was cool to watch the head move around; the electro-magnet is quite strong. Then I grabbed the tweezers and started carving lines into the top platter as it spun. Interestingly, the resulting pattern shows that the tweezers were actually bouncing up and down at some very high frequency:

dscn4691.jpg

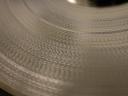
Remember, those platters were going at 7200 RPM, and the little dashes are tiny! It’s possible to calculate the frequency, but I gave that platter away and don’t care enough.

My advice to hard drive manufacturers:

Quit being cheap bastards and put a fuse or something on these damn things!

My advice to people looking to get an enclosure:

Try to find one with a built-in power supply (they are pricey, look for the ones that cost ~$100), buy a cheap one and hot-glue the power supply to it, or just go and buy a turn-key portable drive. Or, at least, don’t ever try another power supply on it unless you know it was meant for an identical enclosure.

What now?

I’m going to figure out how run these spindle motors and use them for something cool. I’ve read that they are servos… can’t figure out which of the four leads I should power, and how. We’ll see if one of my friends knows.

iLoophole

This post is somewhat in continuation to the post about putting your iTunes library on a portable drive.

Today I went to plug my iPod into the computer and upload some new MP3’s. Since I wasn’t doing it at my home computer, I expected iTunes to demand that I delete the entire contents of the iPod so that I wouldn’t steal music from myself.

However, I was pleasantly surprised to find that the iPod appeared full on iTunes and there was no request to reinitialize it or whatever they call it. It seems, then, that the way iTunes tells “which computer it’s running on” is by some signature (or equivalent) in the library files. I did, after all, follow my own advice and create a symlink for the iTunes library files so that I could put it on a portable drive. Since the library was created on the same computer I originally used to upload songs to the iPod, it seems that as long as the library open in iTunes is the one on my portable drive, the iPod will not be erased when I plug it in.

That’s neat. iTunes maybe an annoying turd sometimes, but at least a lot of things seem to “fall into plate”, such as their overall decent COM interface.

The next thing is of course to set up the symlinks in my iBook and see if it all still functions flawlessly there. But I don’t really care because the iBook is really slow, so I may never try it.

Dead floppy drive?

If you still have a computer from the era when they all included floppy drives, then most likely the floppy drive is dead. Why? Because they are pieces of #^#@, and fill up with dust, and because they have a mean-time-before-failure equal to the time between your buying it and your needing it desperately minus 5 minutes (like when you have to use a “third party driver” to install windows on an SATA drive or similar and the setup of course demands it be on a floppy even though everything is on CD’s these days).

Well, this program won’t help you during Windows setup, but it could help you in other situations (which are also automatically stupid) where you may need the computer to think it has a floppy drive.

One good example is installing Asus drivers (for motherboards at least). Now I like Asus, but they are complete morons when it comes to drives and their website. Downloading anything from their website is slower than swimming to China and getting the hard copy yourself. Their motherboards have a great feature where you can flash a BIOS from a CD (and I think also the Internet once you have Windows installed), yet some of their drivers are executables which will only extract to a floppy disk. Talk about retarted, especially when it’s an ethernet driver.

In the case of my K8N-DL it was the RAID driver. I think in my PC-DL Deluxe it was something more annoying like the on-board NIC. In any case, it pissed me the hell off, but Virtual Floppy will save you when you have Windows installed already. It will create a fake drive that Windows and all stupid programs that demand one will see it as a floppy drive. You can fake a variety of disk sizes, too.

It’s indispensable if you like Asus motherboards.